

The first time I tried to animate an architecture diagram, I made every box fade in at once with arrows pulsing everywhere. It looked busy and explained nothing. What finally worked was much simpler: decide the order first, reveal one component at a time, and keep the layout perfectly still.
In this tutorial I will show you exactly how I animate an architecture diagram step by step in ByteDiagram, using a real-world example: a web app request flow with a client, a CDN, a load balancer, an API, a cache, a database and a queue. Every button I mention is in the editor today. Full disclosure: I build ByteDiagram. If you want the bigger picture first, including other methods and tools, read the overview on how to create animated architecture diagrams.
The example we will animate
Here is the story the animation should tell, in order:
- Client: the browser sends a request.
- CDN: static files are served from the edge.
- Load balancer: the dynamic request is routed to a healthy API instance.
- API: the application handles the request.
- Cache: the API checks the cache first.
- Database: on a cache miss, the API reads from the database.
- Queue: slow work, such as sending an email, goes onto a queue to be processed later.
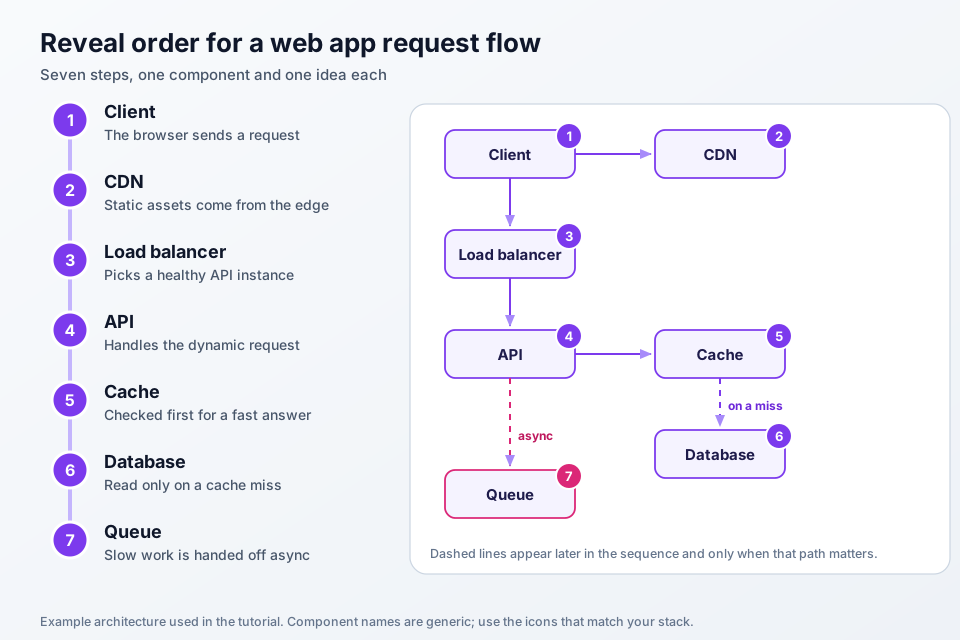
Writing the story down first is the most important step, and it takes two minutes. Each line becomes one step in the animation. If you want to go deeper on any single component, I have separate posts on CDN architecture with edge caches and an origin shield and on load balancer architecture patterns.
Step 1: Open the canvas and choose the architecture type
Open the editor. You do not need an account to start: the canvas auto-saves on your device, and if you sign up later, that canvas moves into your account as your first project. Every canvas has a diagram type, and you can change it from the chip next to the logo. I pick system architecture, because the type decides which shapes show up in the sidebar, how auto-layout behaves and which templates you see.
Step 2: Add the seven components with tech icons
Open the Icons panel in the sidebar. It covers AWS, Azure, Google Cloud and the rest of the stack, and you can expand a category or search. For this example I dragged in:
- a plain labeled shape called Browser for the client,
- Amazon CloudFront for the CDN (Cloudflare is in the library too),
- Elastic Load Balancing for the load balancer (Nginx works if you run your own),
- another labeled shape called API,
- Redis for the cache,
- PostgreSQL for the database,
- Amazon SQS for the queue (RabbitMQ and Kafka are also there).
Use whatever matches your real stack. The point is consistency: one icon style, and every component labeled with what it does.
Step 3: Lay it out and connect the components
I place the request path left to right: Browser, CDN, load balancer, API. Then the cache, database and queue go in a row below the API. Drag from one node's handle to another to connect them. If the layout gets messy, Auto-arrange tidies it in one click, and snap to grid and alignment guides keep everything lined up.
Now label the lines. Hover a line and a small toolbar appears with a Line label field, a color picker and solid, dashed or dotted styles. I label the API to cache line "GET order", make the cache to database line dashed with the label "on a miss", and make the API to queue line dashed with "publish job". Dashed lines tell the viewer at a glance that a path is conditional or asynchronous.
Important: this is the final layout. Do not plan to move boxes during the animation. Only visibility will change.
Step 4: Turn on Flow for the request path
The same hover toolbar has a Flow checkbox. Ticking it animates the line so the request visibly travels along it. I turn Flow on for the main request path and leave the dashed lines static, so the eye follows the happy path first. It is tempting to animate every line, but when everything moves, nothing stands out.
Step 5: Set the reveal order in the sequence builder
Open the Timeline menu at the top right and choose Sequence builder. It lists every node and connection as a card, already in a sensible order: it starts from nodes with no incoming connections (the Browser here), and places each connection just before the node it leads to. For a left-to-right request path, that is very close to the story we wrote down.
To change the order, drag a card up or down, or use the up and down arrows on it. Click a card to open its settings:
- Sequence order, with Up and Down buttons.
- Delay, from 0 to 10 seconds.
- Duration, from 0.5 to 5 seconds.
- Animation type: Fade In, Slide In, Scale In or Bounce In for nodes, and Draw, Flow or Pulse for connections.
- Visibility, to hide an element from the animation entirely.
For this diagram I move the queue and its dashed connection to the very end, and put the cache before the database so the "check the cache first" idea lands before the miss. I use Fade In for every node and Draw for the connections. Consistent motion keeps the viewer focused on the order instead of the effects. Click Test to see the order play out step by step, Preview with Sequence to watch the animation, and Save Changes when you are happy.
Step 6: Fine-tune the timing
If you want to see the whole thing on a time ruler, open Timeline, then Timeline builder. Each element gets a bar, and clicking a bar lets you set its start time and duration with sliders. The Auto Flow button rebuilds the timing from the flow of the diagram, one second per element, which is a good reset if you get lost. Play runs it, and Save keeps it.
For more control, the bottom timeline (Timeline, then Bottom timeline) works like a small video editor. It has a playhead, Play and Loop controls, a Build button that generates clips for you, and tracks for scenes and camera keyframes. A camera keyframe can focus on a single node, which is handy for drawing attention to the cache step. I only use the camera for one or two moments; constant camera moves are tiring to watch.
Step 7: Rehearse in presentation mode
Click Present. Presentation mode walks through the diagram scene by scene: the arrow keys or Space move forward and back, and Esc exits. There is a fullscreen button too. I always do one full run here before exporting, reading each step out loud. If I stumble over a step, it usually has two ideas in it, and I go back and split it.
Step 8: Export the animation
Open the Export menu. Under Animation there are three options:
- Timeline GIF ("Reveal one by one") plays your reveal order. This is the one for a step-by-step architecture walkthrough.
- Animated GIF ("Whole diagram, lines in motion") shows the full diagram with the Flow lines moving. Good for a looping hero image.
- MP4 video is available on paid plans and is marked Pro in the menu. Use it for YouTube, courses or slides.
Under Image you also get PNG, SVG and PDF, which I always export too, as a static fallback for docs and reviews. If you are signed in, the Share menu can also create an embed link.
Optional: let AI draft the timeline
If you are signed in, the More menu has an AI section with an AI animation timeline option. It generates an animation timeline for the diagram, and you edit it from there. AI features use AI credits, and the free plan includes a small monthly allowance. I still check every step by hand, because only you know which part of the story matters most.
Mistakes I made so you do not have to
- Revealing several components at once. If the cache and the database appear together, nobody sees that the cache comes first. One component per step.
- Moving boxes between steps. It looks clever and confuses everyone. Final layout first, then animate visibility only.
- Mixing effects. Bounce on one node, slide on the next. Pick one node effect and one connection effect.
- Forgetting the last frame. The animation should end on the complete diagram, because that is the frame people screenshot.
If you like this style of diagram, my guide to making ByteByteGo-style animated diagrams for free covers the visual side in more depth.
FAQ
How do I animate an architecture diagram step by step?
Write the request flow as a numbered list, build the diagram in its final layout, then set the reveal order so each component or connection appears in turn. In ByteDiagram you do this in the sequence builder, rehearse it in presentation mode, and export a Timeline GIF that reveals components one by one.
Do I need an account to animate a diagram in ByteDiagram?
No. You can open the canvas without an account, and your work auto-saves on your device. If you sign up later, that canvas becomes your first project. Cloud saving, version history, share embed links and AI features need you to be signed in.
Can I export the animation as a video?
Yes, on paid plans. The Export menu offers MP4 video for paid plans, marked Pro in the menu. The free plan includes GIF export: a Timeline GIF that reveals one step at a time, and an Animated GIF of the whole diagram with lines in motion.
What is the difference between the sequence builder and the timeline builder?
The sequence builder is a list of every node and connection in reveal order, with settings for delay, duration, animation type and visibility. The timeline builder shows the same elements as bars on a time ruler, where you set start time and duration. The bottom timeline adds a playhead, scenes and camera keyframes.
Which components should appear first in an animated architecture diagram?
Start with whoever makes the request, usually the client or user, so the viewer has an anchor. Then follow the request path in order. Leave conditional paths, such as a cache miss, and asynchronous work, such as a queue, until after the main path is on screen.
Build this web app animation yourself
Open the editor, add the seven components from the Icons panel, set the order in the sequence builder, and export a Timeline GIF. You can start without an account.
Open Diagram Editor